 |
ADVANCED CHARACTER SET UP
IN MAYA 3.0
Spline Handle Controlls
 |
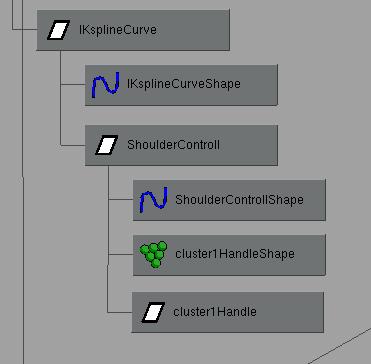
What we want to do here is make a spline IK, attach clusters to it and then attach curve handles to the clusters to animate them. The tricky part is getting the clusters attached to the skeleton hierarchy without having them freak out (step 5). 1) make clusters for each of the cv's you want to animate in your spline IK
2) make the Control curves you want to use to pick them and place them where you want. Rename them something memorable (in this example I named it "ShoulderControll" which is spelled wrong, sue me.)
3) parent the Control Curves under your Spline IK curve in your skeleton's hierarchy.
4) Freeze transformations on the Control Curves for keyframing later.
5) select "display -> shape nodes" in the hypergraph, and open the attribute Editor for the cluster shape node. Under the "weightedNode" category, type in the name of your Control Curve.
6) parent the clusterHandle under the under the curve too. It should all look like the above illustration.
When you have multiple clusters (and you will) they should look like the illustration below:
One last thing: The hips. This is pretty easy but I thought I'd mention it anyway. Finishing up
They should be set up like in the following illustration (basically you make a Control Curve, and stick the skeleton Hierarchy underneath that):
if you want to have your hips be able to rotate independently of the shoulders (to get that boogie dancing effect) you can just add this expression:
Notice that I attach it to a locator under the Shoulder Curve, so I don't mess up my Shoulder's Control Curves values for keyframing (like we learned in the first section).
shoulderLocator.rotateX = hipsCurve.rotateX * -1;
shoulderLocator.rotateY = hipsCurve.rotateY * -1;
shoulderLocator.rotateZ = hipsCurve.rotateZ * -1;Well that's it. Have fun.
[ Setup Intro | Translation & Orientation | Toe Roll | Spline Handles ]


(c) 2003, All Rights Reserved. "Make Links not Copies"